Basics
Godot is a free and open source cross-platform game engine that supports game design for 2D and 3D games. It is a great tool for beginners and experts alike. It is also a great tool for teaching game design and programming. This guide will help you get started with Godot and teach you how to make a simple 2D game.
Getting started
There are several options for developing with Godot. The recommended way is to download the latest version from the downloads page for Windows/macOS/Linux. It will be what we use for this guide.
- Run the engine in a web browser with the Godot Web Editor (v4.1.1). This is the easiest way to get started, but it has documented limitations and is not recommended for large projects.
- Download the android app from the Google Play Store, while functional it is in early access and may not be stable. It is also difficult to use on phones, and tablets are still difficult without a keyboard and mouse.
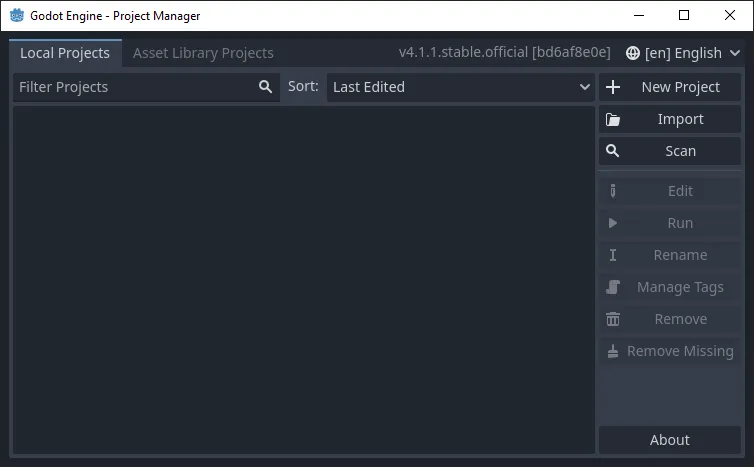
- (Recommended) Download the latest version from the downloads page for your platform to run locally. On running, you should see a window similar to this:
Creating a project
Making a new project
Click the New Project button to create a new project, the following window will appear:
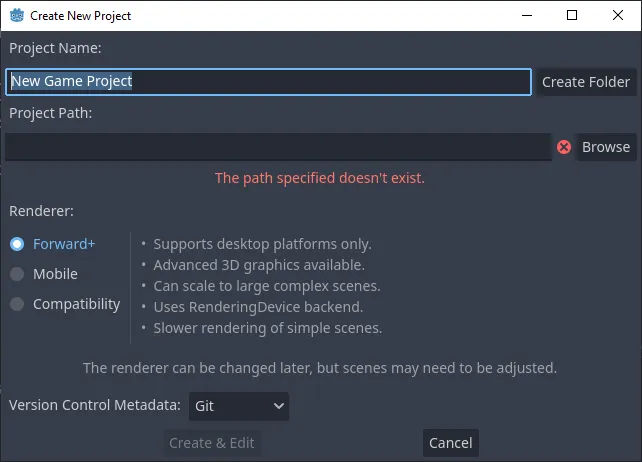
Project Name:
This is the name of your project, it can be anything you want. For this guide, we will use Godot Is Awesome!.
You can use the Create Folder button to create an empty folder with the name of your project at the project path.
Project Path:
This is the path to the folder where your project will be stored.
You can use the Browse button to select a folder or type in the path manually.
It is recommended you use an empty folder for your project.
Renderer:
Godot has three renderer presets: Forward+, Mobile, and Compatibility.
For this guide, we will use the Forward+ preset.
Forward+ is only good for desktop and console platforms, and has the most features.
Mobile is best for mobile platforms, but supports desktop, and has fewer features with better performance.
Compatibility supports desktop, mobile, and web platforms, it has the fewest features and the best performance. It is not recommended to use compatibility for 3D projects.
Version Control Metadata:
This is used to store version control information in the project folder. It is recommended to leave this on Git even if you are not using version control. It is also recommended to use version control for your projects, but it is not required. To use git version contol, after creating the project navigate to the project folder and create a git repository.
2D or 3D?
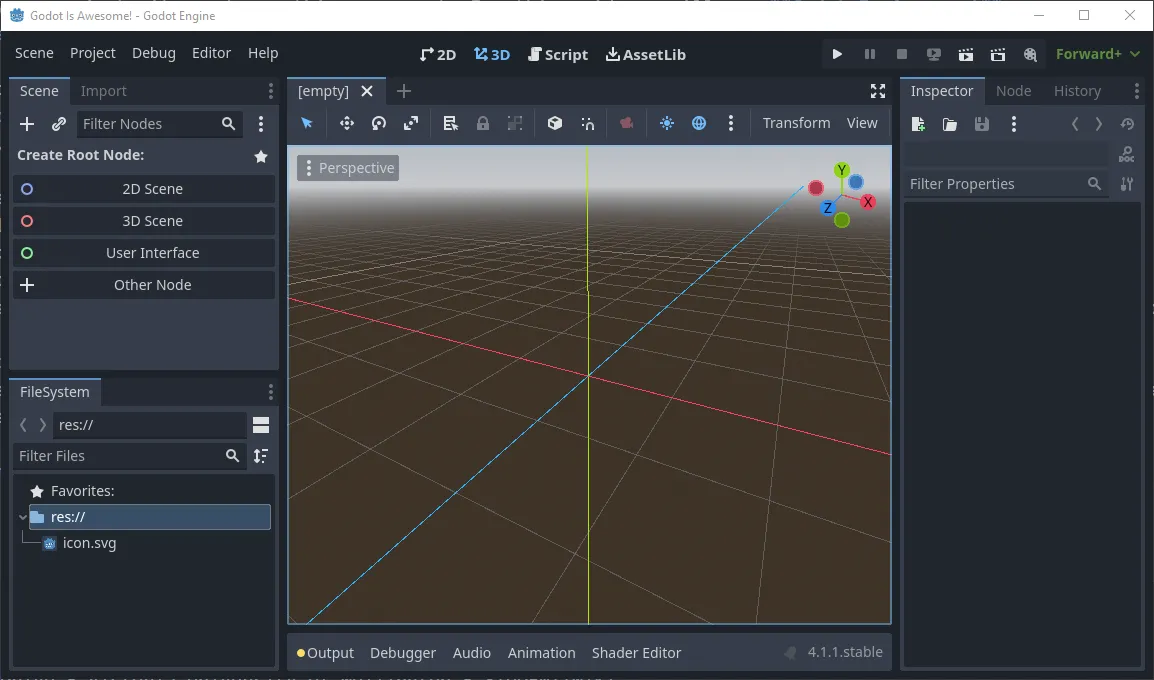
The next window that’ll open is the meat of the game engine, it is where you make your actual game. At first, it can be a little daunting, all the buttons and docks, but it’s simple to understand once you’ve used it a bit.
 For this guide, we will use 2D to introduce all the key concepts.
But, if you’re already familiar with game development and want to start with 3D, we have a 3d guide as well. If you choose this you may miss out on core aspects like signals.
For this guide, we will use 2D to introduce all the key concepts.
But, if you’re already familiar with game development and want to start with 3D, we have a 3d guide as well. If you choose this you may miss out on core aspects like signals.
The interface
The interface is made up of several docks. The most important ones are the Scene dock (top left), the Inspector dock (right), and the FileSystem dock (bottom left).
The four main screens of Godot are the 2D screen, the 3D screen, the Script screen, and the AssetLib screen. You can switch between them with the buttons at the top of the screen.
Components of a game
At the top left under Create Root Node: click the 2D Scene button. This will create a new scene with a Node2D root node.
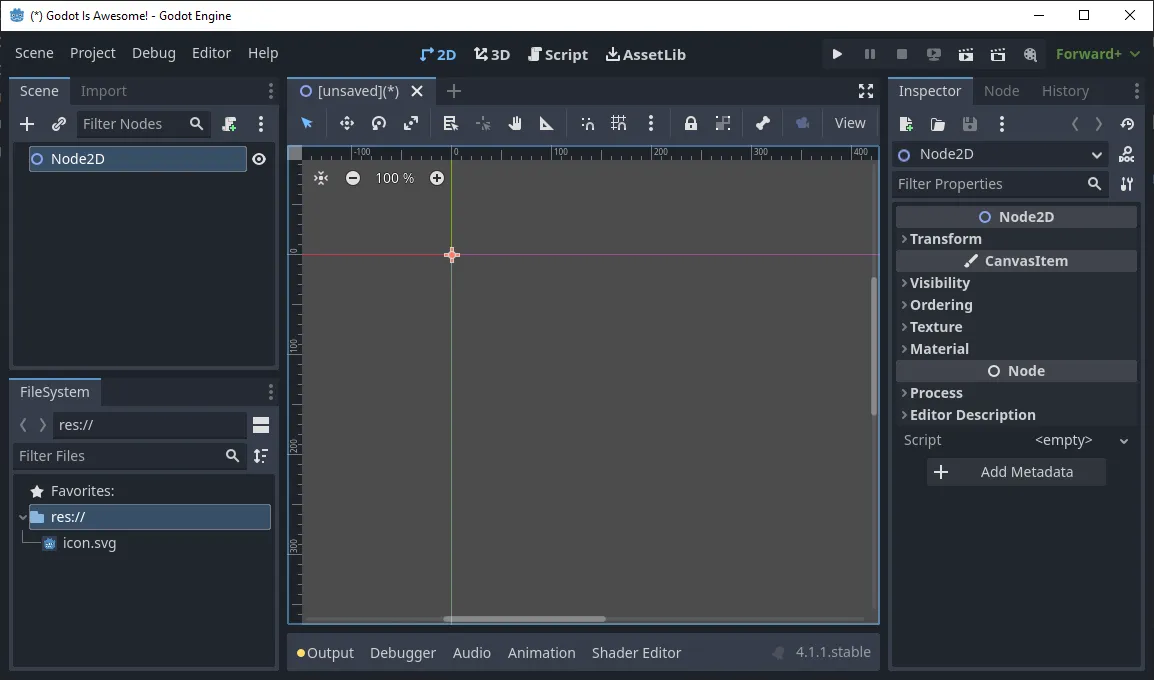
This should be the core scene of your game, or the scene that you do the core of your development in.
At any time save your scene with Scene > Save Scene or save all scenes with Scene > Save All Scenes, we saved the scene as main.tscn.
Nodes
Nodes are the building blocks of your game. They are the objects that make up your game. They can be anything from a sprite to a camera.
Nodes are organized in a tree structure, with the root node at the top and child nodes below it. Nodes can have any number of child nodes, but only one parent node.
You can see all the types of nodes with the Add Child Node button in the top left of the Scene dock, or by right-clicking any node in the Scene dock and selecting Add Child Node.
It’s worth taking a look at your options, but for now we’ll start with CharacterBody2D. It can be hard to find since it’s nested inside several nodes, but you can search for it in the bar.
CharacterBody2D is a node designed for objects that interact with physics that will be controlled by the player.
You’ll notice it has a warning icon next to it, go ahead and add both the Sprite2D and CollisionShape2D nodes as children to the CharacterBody2D node.
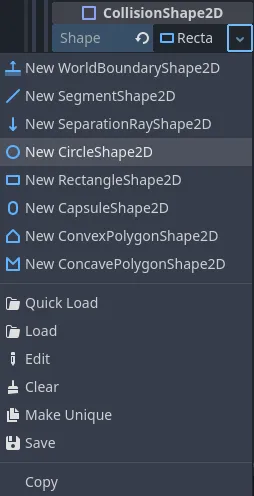
Now the CollisionShape2D node has a warning icon, this is because it needs a shape to define its collision. On the right side of the screen you’ll see the Inspector tab, this is where you can edit the properties of the selected node. Select the CollisionShape2D and change the first property, the shape, to a New CircleShape2D.
Similarly, on the Sprite2D node, you can change the texture property to a new texture. Save the little birdie image below to your device with right-click > Save Image As… and drag it into the FileSystem tab in the bottom left of the screen, alternatively you can make your own image and use that. Once it’s in the FileSystem tab, you can drag it into the texture property of the Sprite2D node.
![]()
Your scene should now look something like this:
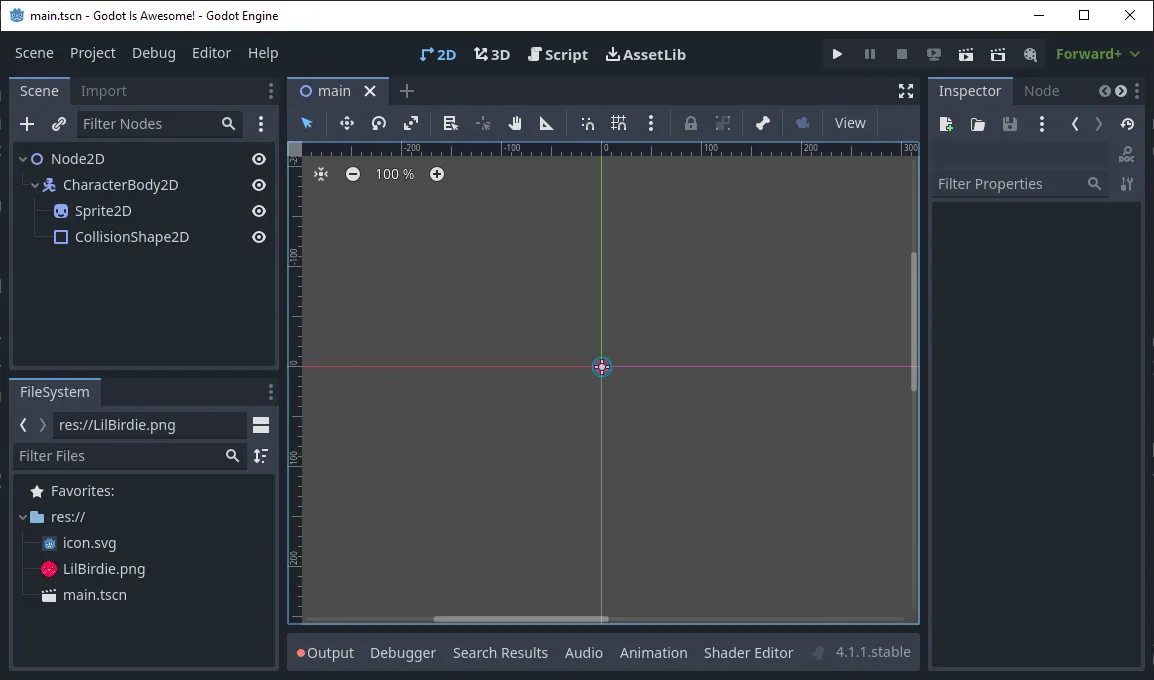
In the viewport is the largest area of the screen that shows the scene. You can move around the viewport with the middle mouse button and zoom in and out with the scroll wheel. Zooming into the small circle where the red and green lines meet, you might notice the pixelated texture is fuzzy. This is because the texture is being scaled up to fit the size of the sprite. To fix this, go to the Sprite2D node and change the property CanvasItem > Texture > Filter to Nearest. Only do this for pixel art textures. In the future, if you do not want to change the Filter property for every Sprite2D node, you can change any parent node’s Filter property to Nearest and all child nodes will inherit it if their Filter property is set to Inherit. For an all pixel art game you might as well set the root node’s (Node2D) Filter property to Nearest.
Scenes
Scenes are collections of nodes that make up a part of your game. They can be anything from a single node to a complex hierarchy of nodes. Scenes can be saved as files and reused in other scenes.
You can convert the current CharacterBody2D node into a scene by right-clicking it and selecting Save Branch as Scene. Save it as player.tscn, also rename the node from CharacterBody2D to player by double-clicking the name. Now if you want to edit the child nodes of your player character, you can open the player.tscn scene by clicking the new Open in Editor button next to the player node in the Scene tab. You can also open the scene by double-clicking the player.tscn file in the FileSystem tab.
Go ahead and open the player scene and add the Camera2D node as a child to the CharacterBody2D node. This will make the camera follow the player character. You can also turn on Position Smoothing > Enable in the Camera2D node’s properties to make the camera movement smoother. Save the player scene. Above the viewport you can go back to the main scene by clicking the tab called the name of your main scene.
Start your magnificent game by clicking the Run Project button in the top right of the screen or by pressing F5. You should see a window like this:
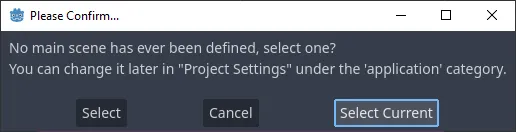 Press Select Current if you are in your main scene. Now your gorgeous game should be running! Let’s get some interaction in there.
Scripts
Scripts are what make your game do things. They are written in GDScript, a language similar to Python if you squint hard enough. As mentioned before, you can write scripts in C# as well, but it is not recommended for beginners. If you are familiar with C# you can use the C# documentation to help you write your scripts.
Making a new script
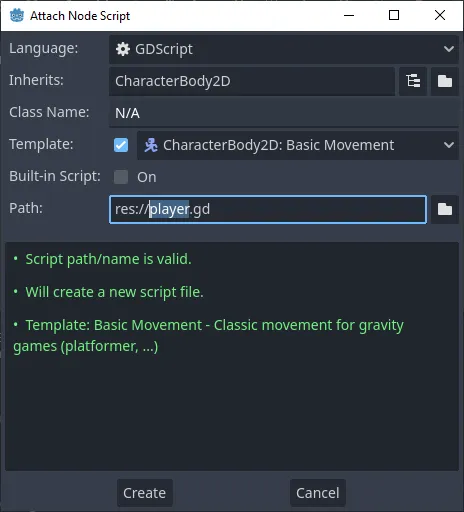
To add a script to a node, select the node and right-click > Attach Script or press the Attach a new or existing script to the selected node button above the hierarchy. For now, add a script to the player node, it will open a new window that looks like:
 The defaults are fine, but let’s go over what each field means.
Language:
This is the language you want to write your script in, for this guide we will use GDScript, and it will most likely be the only one you have available, but this is where C# would show up as well if you have it installed.
Inherits:
This is the class that the script will inherit from, the player should inherit from CharacterBody2D.
Class name:
Seemingly it does not change nor can you change it. Unsure as to its purpose.
Template:
This is a template for the script, often you might want to set it to the default node or empty object, but for this character we will use the CharacterBody2D: Basic Movement template since it has basic functions you might want for your player already setup.
Built-in Script:
Built in scripts don’t make a separate file for the scripts, they are stored within the node. This is useful for small scripts that you don’t want to make a separate file for just to keep things clean, but it is not recommended for larger scripts or scripts that will be used by multiple nodes. For the player, we will not use a built-in script.
Path:
This is the path to the script file. If you are not using a built-in script, it will be replaced by a ”Name:” field. For the player, we will use the default path res://player.gd. It is a good idea to make a folder just for scripts or just for scenes to make organization easier, but for this small project this is easier.
Click Create and you should automatically switch to the script screen. It should have the script you just made loaded in and look like this:
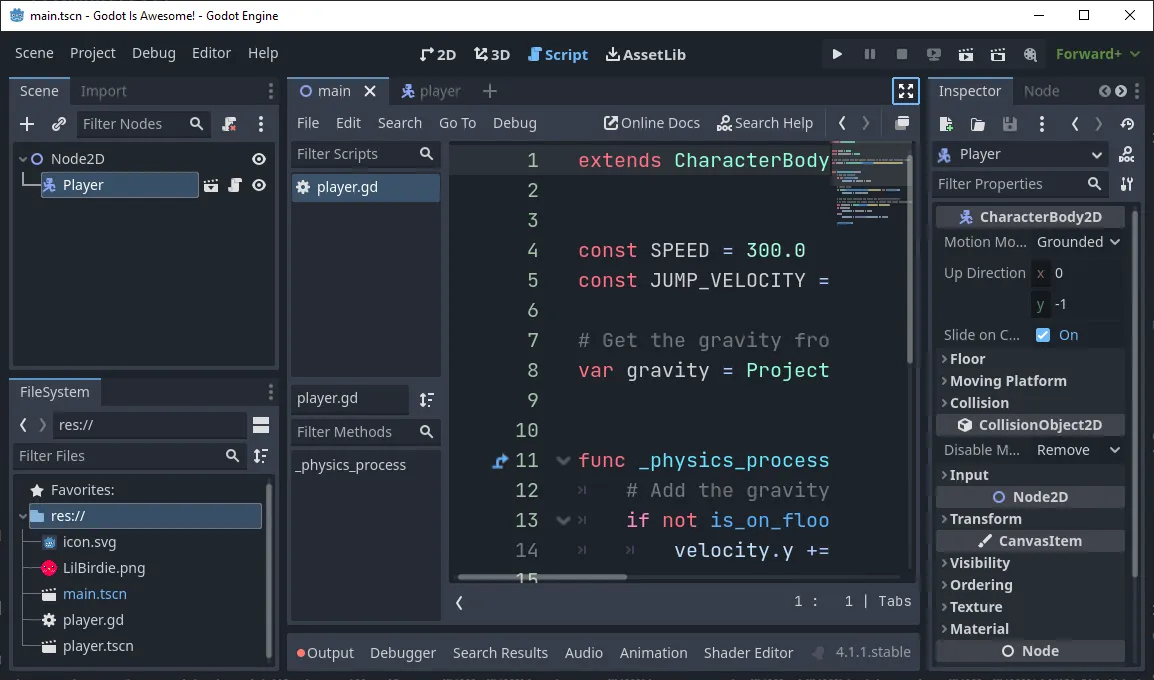 You can make the script take up the whole window with the full-screen icon in the top right, and if you have a console open, you can close it by pressing Output at the bottom of the screen.
Now if you run the game with F5 the player should fall down.
Adding a platform
For the sake of testing, let’s add a platform the player can jump around on.
In the Scene dock on the main scene, add StaticBody2D as a child node to Node2D. Add Sprite2D and CollisionShape2D as child nodes to StaticBody2D. Give the sprite the pixel art below this paragraph, the same way you did the player. If you didn’t set Node2D’s property CanvasItem > Texture > Filter to Nearest then you’ll need to set the sprite’s Filter property to Nearest. Set the collision shape’s shape to RectangleShape2D. If you switch from the Script screen to the 2D screen and select the collision shape, you can adjust the size with the eight orange dots, make the collider the same shape and size as the pixel art. Next, select the StaticBody2D node and press W or the Move Mode button at the top of the viewport, the second button from the left. Use the green arrow to move the node and its child nodes down, so it’s below the player. Press Q or the Select Mode to return to a regular cursor.
![]()
When running, your game should now look something like this:
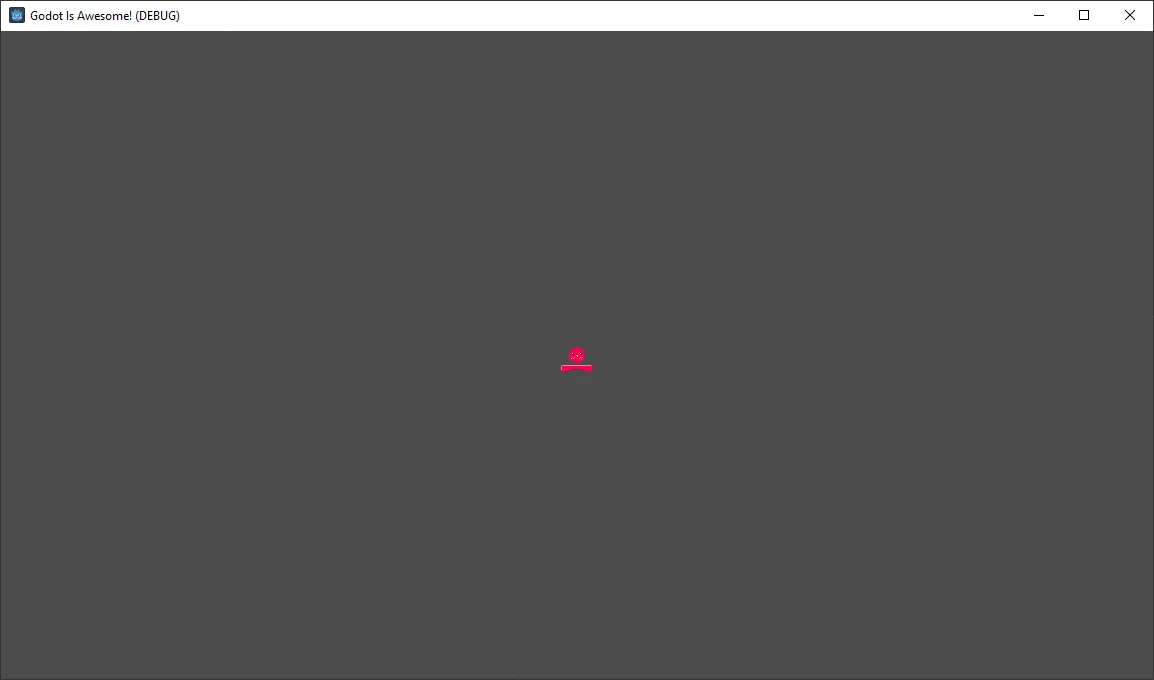 You can move around with arrow keys and jump with space, if you fall off your player will fall out of the screen.
So you have more space to move around and test on, make the platform larger with the Scale Mode button at the top of the viewport, the third button from the left, or by pressing S. Select the StaticBody2D node and drag in the viewport to make the platform larger. Hold Shift while scaling to scale the node evenly. You may need to move the platform around more, use move mode again to move it. Return to a regular cursor with select mode after you have finished. You can make the player larger if you want to as well, if you do the gap between the player’s sprite and collider will be larger, so you may need to adjust the size of the collider in the player scene to be the same size as the sprite.
It is recommended you make this platform a separate scene as well, so you can reuse it in other scenes or copy paste it and when you change one you don’t have to change them all.
Modifying the default script
If you have never programmed before, it is recommended you start with a simple language like Scratch. If you are familiar with programming, but not GDScript, you can use the GDScript documentation to help you write your scripts.
The default script that came with CharacterBody2D should look like this:
extends CharacterBody2D

const SPEED = 300.0const JUMP_VELOCITY = -400.0
# Get the gravity from the project settings to be synced with RigidBody nodes.var gravity = ProjectSettings.get_setting("physics/2d/default_gravity")

func _physics_process(delta): # Add the gravity. if not is_on_floor():  velocity.y += gravity * delta
 # Handle Jump. if Input.is_action_just_pressed("ui_accept") and is_on_floor():  velocity.y = JUMP_VELOCITY
 # Get the input direction and handle the movement/deceleration. # As good practice, you should replace UI actions with custom gameplay actions. var direction = Input.get_axis("ui_left", "ui_right") if direction:  velocity.x = direction * SPEED else:  velocity.x = move_toward(velocity.x, 0, SPEED)
 move_and_slide()
There are some simple things you can do without adding or removing lines of code.
- Change the fields at the beginning of the script, SPEED and JUMP_VELOCITY. What they do should be self-explanatory, try changing the numbers after the
=and running the game until you get something that you like the feel of. - Change the gravity by going to Project > Project Settings then in the General tab, Physics > 2D > Default Gravity. You can also change the gravity in the script by changing the line
var gravity = ProjectSettings.get_setting("physics/2d/default_gravity")tovar gravity = nwhere n is a number of your choice. - Change the input keys by going to Project > Project Settings tab Input Map and pressing Show Built-in Actions. By looking at the script we can see it is using the actions ui_accept, ui_left, and ui_right. If you want to use WASD instead of the arrow keys, scroll until you find the ui_left action, then double-click the Left input and press A on your keyboard and then press OK. Do the same for ui_right with D.
Some unclear things about GDScript that are good to know:
extends CharacterBody2Dmeans that this script inherits from CharacterBody2D, so it has all the functions and variables that CharacterBody2D has, which extends from PhysicsBody2D, which extends from CollisionObject2D, and so on until it reaches the root node Object. This script has access to every single function and variable from each of those nodes!- Functions that start with an underscore, like
_physics_process, are called automatically by the engine. - You can use CTRL + Click on Windows or ⌘ + Click on macOS to go to the definition of a function or variable. This is useful for seeing what a function does.
- Multiply a variable by
deltain the_physics_processfunction to make it framerate independent. This is useful for making sure your game runs at the same speed on different devices. For example, if you want to move a node 100 pixels per second, you would multiply the velocity bydelta, which is the time between the previous frame and this one measured in seconds:velocity.x += 100 * delta. This is to make it so that when enough frames have passed so that 1 second has passed, it would’ve been100 * 1but spread out across tens of frames to make the motion smooth instead of increasing the velocity by 100 pixels every frame, which is absurdly fast and may be faster or slower on different monitors or devices. move_and_slide()uses the velocity of the node to calculate where the node should move to on this frame, which is why you don’t need to give it any parameters and run it after you have calculated the velocity.
Signals
Signals are the fourth building block of Godot. They are used to communicate when something happens between nodes.
Let’s add a deathbox to the scene.
Start by adding an Area2D node as a child to Node2D.
Add a CollisionShape2D node as a child to Area2D.
Make the CollisionShape2D a New RectangleShape2D and make it larger. Much larger. Specifically, make it very, very wide and only slightly tall. If you want to make it larger on every corner select a corner orange dot and press Alt.
Select the Area2D and press Alt and move it below the platform.
Select Area2D and above the inspector you’ll see the Inspector tab, next to it will be the Node tab.
In the node tab double body_entered(body: Node2D), and then double click your player.
This will create a function that will be called when the player enters the area.
At the top of your script below the SPEED and JUMP_VELOCITY constants, add var respawn_location = Vector2(0, 0). This will be the world location your player will return to when they touch the deathbox.
In func _on_area_2d_body_entered(body): remove pass and add:
if body is CharacterBody2D: global_position = respawn_positionThis checks that the thing that entered the area is the player, and if it is, it sets the world position of the player to the respawn position.
We can add checkpoints almost the exact same way! Copy paste your platform so you have another platform to jump to if you haven’t already.
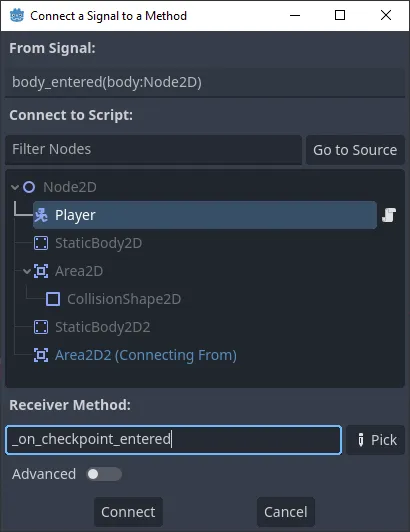
On that platform add a new Area2D node as a child to Node2D. Go back through the previous steps but the only difference here is that you should rename the reciever method so it doesn’t activate the same method.
Here’s what the connect a signal to a method window should look like before pressing Connect or double clicking your player:
 In the new method the only thing that needs to change is
 global_position = respawn_position to respawn_position = global_position.
Now when you enter this checkpoint area the respawn position will be set to the checkpoint’s position, and when you fall into the deathbox the player will respawn at the checkpoint.
Next steps
For a good introduction to writing your own scripts to control nodes, see the Godot documentation. At any time, you can also use the Search Help button in the top right of the Script screen to look up any function or variable.
If you have followed this entire guide, you know enough terminology and technique to make almost any 2D game! You will definitely need to look things up and reference the documentation, no one stops using google, but the more you create, the more you will develop muscle memory and gain understanding. 3D games aren’t much more difficult, read the guide on making a 3D game.
To test your skills, try adding some simple things almost all 2D platformers will have:
- Copy-pasting the platform scene, so there are many to jump between.
- Giving the player a double-jump.
- Try adding a parallax background (hint: Godot has a premade parallax background node), you will need your own art.
- Finally, give the player coyote time (hint: use Godot’s timer node in the player scene) If you don’t know what coyote time is in 2D platformers, look it up, it makes the game feel much better.
If you can do those things by looking up the documentation and using tutorials, then you have developed the skills to make anything you want in Godot.